Do you want to know how to use Instagram ? With this guide you will find lots of useful information on how to use this famous application, and not only from a technical point of view but also countless tips on improving your experience in this social network more and more. I will try to explain some trends and behaviors of general interest, especially for those who are at the first experiences, or who want to improve more and more in its use.
In addition, you will find here many references to other applications, websites and curiosities that revolve around Instagram. A complete guide of everything that can be useful to you, completely free and full of news.
Instagram is mostly used as a social network, but it also has the function to take photos and apply some basic filters. The application is currently native for iPhone and Android, but also used by Windows Phone with third-party applications and by Blackberry with the same Android version. Many examples in the guide will be based on iPhones, but most are valid for other operating systems as well.
1.1. Choose a Username
The first step is choosing the username. Here you decide whether to use an invented name or your real name. If you choose an invented name it is conceivable at least to put your name in the creation of the profile. People tend to interact more when they can at least call you by name.
The username can also be changed later, but then you risk losing the one you chose if it is used by someone else. However, it is a good idea not to change it if you have already generated an identity around that name also on other social networks. People tend to find and identify you more easily if you possibly have the same names, and especially the same icons as images.
1.2. Create the Profile
In your profile you can enter 150 characters to talk a little about yourself. It is a good idea to do this, people are curious to know who is behind the photos, and to know a shred of his personality. You can also connect your web address that represents you the most (blog, facebook, flickr, twitter, and others).
In the private information area there will be your email with which you created the Instagram profile, your phone number if you want to add it and now also the possibility to specify the male or female gender.
1.3. Public or Private Profile?
Always in the area of your profile, at the bottom you will find the possibility to insert your profile as public or private. It is obvious that in the case of a public profile, your photos will be visible to anyone , even if you eventually block people. This is because they may use other applications to be able to see your photos, but obviously they will not be able to interact with you in any way.
In the case of a private profile, to see your photos you will need your authorization to be able to follow you , and it will not be possible to see your profile even using other third-party applications, since the photos will not be visible to people not authorized to follow you. It is obvious that a private profile greatly reduces the possibility of being followed, since only the people who know you will know who you are in order to be able to contact and follow you; in addition, with a private profile the hashtags that you will eventually add to your photos will not be visible, and therefore it will be somewhat useless to do so.
1.4. Choose your profile photo

As mentioned above, creating a name and an image that identifies you in every social network in the same way is very important to increase your visibility and the trust you instill in the network.
By clicking directly on the image space, a drop-down window will open which will give you a whole series of options to upload your photo. You can take one directly at that moment but it would be more appropriate to prepare it better and possibly load it directly from the roll.
Even easier, if you are already present on Twitter and Facebook, is to import it directly from one of these social networks, so that you don’t have to think too much about what to wear, but simply put the same where you are already recognizable and followed by your friends.
2. Use the Instagram Camera
In the section of the Instagram camera we will see the part relating to the use of the application to take photos and apply filters, as well as the various features that these features offer for those who choose to use Instagram also to create their own photos and not just to upload them.
2.1. How to Take a Photo with Instagram
Taking a photo directly with the internal application is very easy but not mandatory. Instagram allows you to upload photos to the social network either by taking them directly from the application or by uploading them from our phone image gallery.
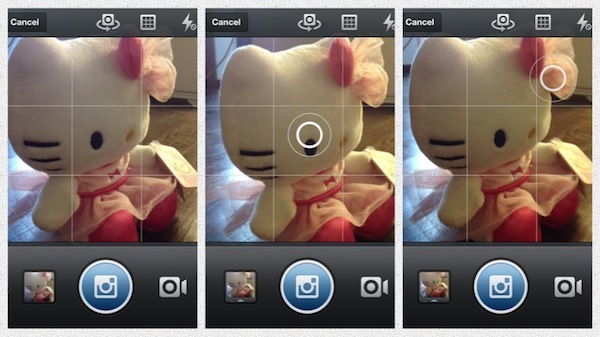
To shoot with the application just click the big button at the bottom center and the relevant camera window will open. At the top we have the option to use the grid (which will allow us to control the composition) and the flash. By clicking directly on the screen, a flashing circle will appear, which will indicate the position of the focus. On landscape situations this option is not necessary, but in the case of shooting close-ups, it will allow us to choose in which point the focus and exposure will be calculated.
2.2. Apply a Filter
Instagram currently allows you to apply 24 filters to the image in the post-shooting phase (and which can be rearranged according to your preferences by clicking the appropriate icon). We can apply these filters both to a photo taken directly with the application, and to other photos we have in the gallery, just import them by clicking the small square at the bottom left.
The choice of the filter is obviously individual and not essential. Know that millions of users use the same filters every day, and after a while you have the trained eye to see the same images over and over again. If you want to be original, there are many applications that offer an incredible variety of filters that you can use before sharing on Instagram, or choose carefully which ones to use depending on the type of image you are going to post.
The filters themselves have become so famous, that it is now possible to emulate Instagram filters, even on PC or Mac computers, using various alternative programs.
2.3. Use Tilt-Shift and Clarity
Instagram adds two features to make the image look even better. The small icon in the shape of a wheel, or sun, will allow you to automatically improve the brightness and contrast of the photo. Sometimes it works well, other times not much, obviously it depends on the kind of general situation in which we took the photo. You can try clicking to see if you like the new image more, otherwise re-click to return to the original image.

The tilt-shift on the other hand is that icon with a small drop. Clicking it repeatedly you will get the effect of the horizontal tilt-shift, in a circle, and return to the original version. In a nutshell it serves to blur the parts outside the circle, or above and below the horizon, in order to give an effect of depth to the image and bring out the object that remains in full focus. Here too, you can slowly learn by clicking, to see what effect it will give you to the second of different images. In some cases it can be greatly appreciated.
From the snapshot with Instagram, the idea of creating a real Instagram SocialMatic camera was born, which is now taking shape more and more.
2.4. The Automatic Alignment Function
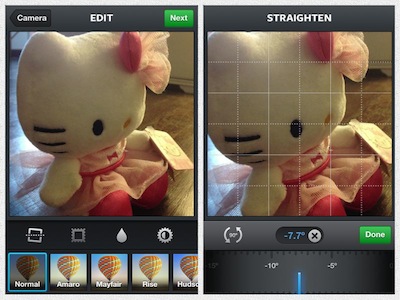
From version 4.1 for iOS there is now a photo self-leveling function, which allows you to align the image horizon when it is not parallel to the center line (automatic straightening).
In a nutshell, the Instagram application will automatically calculate the image alignment and with a simple touch on the relative square icon on the left, the horizon will be aligned, and you will see your photo automatically rotate slightly; while for imported images there is a slider where you can manually align the image before sharing it.
It is natural that this function is valid when capturing images of landscapes, seas, and the like. But in any case, the wheel at the bottom, or slider, will still allow us to tilt the image to our liking, to obtain sometimes original results, and better than the initial angle of the image. So try using this feature to see if you can get better results.
2.5. Edit them Photo
Version 6.0 introduces photo editing of images. It is very simple, since clicking on the wrench icon will open the options for editing images in the most common ways.
You will then find brightness, contrast, temperature, light, shadows, vignetting and so on. Just slide the horizontal bar left and right to see the effect on the screen.
The most interesting aspect is that of being able to now select the intensity of the filter to be applied to the photo, so as to be able to better define the result.
With version 6.10, Color and Fade are added . With Color you can adjust the intensity of the color, specifically it will adjust the tint of light reflections and shadows. While Fade will make the colors softer and vary the hue.
2.6. Save the Photos
Version 3.2 slightly changed the previous settings, in any case, in the internal settings of the application, you can choose the option to save the original photo.

Every time we take a photo, the same shot will also be saved in the phone’s internal roll; to save the photo with the filter, however, it will be necessary to share the image in the social network. In the iPhone version an Instagram album will be automatically created where all the photos taken with the application will end up, and there is no option to do otherwise.
3. Publish the photos on Instagram
In this section we will see the basic part of publishing photos directly on the social network. A number of other features will then be seen later in order to give a complete picture of its use.
3.1. Post a Photo

Once your photo is ready, you are finally ready to share it on the social network, where millions of other people will have the chance to see it. In the next screen there will be the possibility to insert a comment , or a title to the same, and then you can also insert the hashtags (#). We will see the latter in detail later.
From version 6.2 it is possible to edit the first comment on the photo even after it has been published, using the appropriate edit button.
In addition to the possibility of writing what we consider most interesting, we will also have the possibility to enter the location of where the image was taken, and possibly tag a friend of ours if we want this photo to go directly to his profile, subject to his approval.
In addition, on the same screen, you can also directly share the same photo on different social networks that you have previously set up within the application. If you want to build a more professional image, it will certainly be a good idea to share on each social network in a different way, with the appropriate tags and with a dedicated comment. Often for lack of time these details are not carried out and it is published in the same way everywhere. Better to use fewer social networks and better manage them rather than the other way around, in the long run these efforts will pay off. Unless of course we do not use the social network for pure fun, and then we will not think too much about these subtleties.
3.2. How to Tag a Friend
Version 3.5 introduces the ability to tag users to photos . Immediately after writing your comments you will see the option with a little man on the left that will give you the possibility to add a tag to a person, or to another profile: not to be confused with writing hashtags in the comments.
You can add a tag to both an individual and any profile. Instagram will not distinguish between these options, simply tag the username you are interested in identifying. This means, practically, hooking your photo to another profile, which will receive a notification in his account, and depending on the settings he has entered, your photo will go into his profile automatically, or after confirmation or not. by the recipient.
You can tag other users, just click on the relative icon with the little man, then tap anywhere in the photo , search for their names and add them. You can only tag photos that are yours and that you upload and you cannot self-tag photos of other users in your profile.

From the images above you can see the details of the novelty. Obviously in the same way, you too can choose whether to automatically show the photos of other people you are tagged on, or whether to decide manually (preferable option). On your profile screen, an icon will appear that will indicate that someone has tagged you and will allow you to take the necessary actions to validate that particular photo or not. If you want to remove the tag, you have to click on the photo, which will take you to the person’s profile, and remove the tag that they inserted.
3.3 Using Location

And finally, the 3.0 version of Instagram brings a novelty, namely the ability to add your photos with the location, to the map; and also see related photos of your friends. Activation is very simple and has been active for a while now, simply click ON immediately after the option of the friends tags, and we will be asked for authorization to enter the location data . The photos can however be removed later.
If by chance you have been absent from Instagram for a long time, and you had an old profile, the application will probably ask you which photos you want to add to the maps, and you will have the possibility to select them one by one; while the unselected photos will see the current location permanently removed.
Going then to the profile of your friends, and clicking the drop icon in reverse, you can see their photos and their geographical position on the map; always if they have activated the option for localization.
4. Videos are Instagram
In the race for applications that share videos, now there is also Instagram. An addition that pleased some users while it made others turn up their noses. So let’s see how they work and what can be done.
4.1 How Instagram Videos Work
With the introduction of videos, you can now share both videos and photos within the same profile. I still remember when the first Instagram video was released, however, made with 1905 Instagram photographs, luckily now it no longer requires all this work!
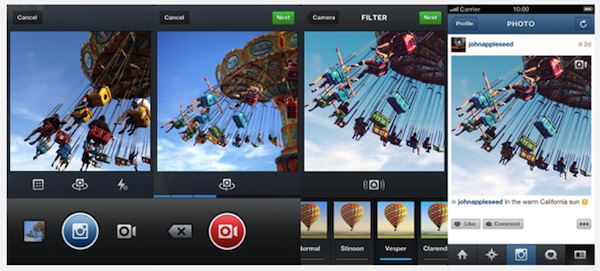
As we have already mentioned about how videos on instagram work, you can record videos up to 15 seconds and you can do it by simply clicking on the video button, which is right next to the button for taking photos. It is also possible to pause the video to resume 15 seconds in separate moments, just keep the record button pressed, and every time this is released, the video will pause, by pressing the button again, the video will restart, and deleting, the last clip of the video will be deleted. With a few simple tests and trials, you will quickly learn to use this interesting additional feature.
A stabilization algorithm called Cinema will be included in the video function , which does not work wonders but which in some situations helps to stabilize annoying hand movements. You can then add 13 dedicated filters to the videos exclusively for this type of functionality, and the live preview is visible.
Starting from the 4.1 update, users can import their videos directly from their gallery, which will be reduced to 15 seconds where you can decide the starting point, so you can insert the part that interests us. At the same time the videos will be cropped in square format and it will be up to the user to decide which part of the recording to keep.
After the video, you can choose a cover to show on the social network as the first image. Add comments, hashtags and location as in the photos. After that it can be shared on Facebook, Twitter, Tumblr, Foursquare and via email. There is currently no feature to save the video, so you can email it to make sure you don’t lose it.
And if you are interested, there are also several programs to download videos from instagram that you can use.
5. Other Features of Instagram
Once you have created your profile, learned how to take and record videos, apply filters and post photos on the social network, you are ready to go and you can start improving your experience on the social network. The buttons at the bottom of the home screen show you from the left: home, popular / explorer and search, camera, news, profile. In the Home or Feed, you can gradually see all the photos of your friends. And to indicate LIKE on a photo, just double-tap on any point of the image you see in the feed: a little heart will flash to indicate that the action has taken place.
5.1. On the Explore Page

On the popular photos page, the ones that are most popular go there. Which means everything and nothing! In theory, the algorithm that no one knows, and which serves to decree which photos are entitled to go to the popular page, is based on a mix of how many people click like and post comments, in a short space of time initial to when you posted the photo.
This also takes into account the number of people who follow you in proportion to those who click like. This is why, for example, having many followers but few who click like or comment will be of little or nothing. In any case, Instagram’s popular photo page has long ceased to represent quality, if not simply a lucky combination of that algorithm.
With version 3.0 Instagram, in addition to having previously added the possibility to search in the top bar of this page, other users and hashtags, has now directly changed the name to EXPLORE .
This change is also synonymous with a conceptual change of the system that gives a little less value to the word popular and places it in a more global context of research.
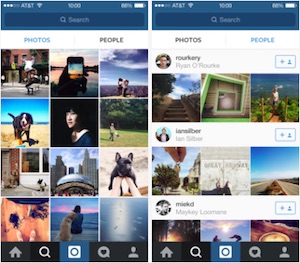
With the 6.2 update on iPhone and 6.10 on Android, the explore page expands and there will now be two columns, one for photos and the other for people. The page for the photos has not changed and the concept is always the same while the other for people will allow you to discover other Instagrammers to possibly follow.
To scroll through the popular photos, you are not obliged to use only the Instagram application, but you can also use third-party applications, most of which are free. Some of these try to improve the visibility of the photos, others try to give more tools available.
These include, for example, Gramory for iPhone, Instagallery and Instafocu for iPhone and iPad, Instagrille for Windows PC, and InstaCam and Metro.am for Windows Phone phones. And for example, you might like to see them in slideshow style with Instacram for iPad and directly create them with Flipagram for iPhone.
5.2. Colleagues of Social Networks

With version 3.0 you can connect your Instagram account to: Twitter, Facebook, Flickr, Tumblr, Foursquare and Email. Although it is convenient to do so, it is also true that the hashtags (which we will see later) also end up in other social networks, and are not always aesthetically beautiful or suitable for the social network (eg twitter). If you want to be more precise, it is worth doing a separate upload for each social network, but obviously it is a matter of choices, practicality and target audience to which you are addressing.
Version 3.0 inserts the email inside the shares, increasing their practicality. You can thus save your favorite contacts to speed up sharing operations; addresses can be added either from your contacts or manually.
5.3. Greater Integration with Facebook
With the new update 2.5, it is now possible to connect more with Facebook and the two social networks will integrate more and more, since they are now the same company. Once connected, the photos posted on Instagram go directly to Facebook, or to the profile, or to a Facebook page that you manage connected to your profile. By activating a special option you can share “likes” on Instagram even directly on your Timeline or Facebook diary.
* For Android it is currently possible to connect only the Facebook profile and not a page that you administer.
5.4 Write a Comment
Writing a comment is very easy. Just click on the comments button to open the field where you can write. If you want to increase your interaction, also write comments; it is often more important than just clicking like the photo. People tend to consider you more if you interact with them and may decide to follow you more easily.
You will probably find some people with the writing in the profile (no ghost followers), and they really want to point out that they prefer people who interact by writing comments rather than passive numbers among those who follow them. But be careful not to make spam comments and above all not to write web addresses (url) in the comments, or you will run a serious risk of being deleted for spam, and you will no longer be able to subscribe to the social network with that phone.
5.5 Mention a User
If you reply to a user, in other people’s photos or in your own photos, in order to be sure that they read your message, you must mention them. The mention, which means writing his name with the @ in front , will give him the opportunity to have your message notified in his notification center. Only mention users if you want to talk to them or give them a particular message, and not for everything else it could be irritating.
Since version 3.0 you can mention a user by swiping from left to right next to his icon in the comments screen; then just click the arrow that will appear (as indicated in the image above).
You can swipe multiple users at a time to mention them all at once. If you do not mention them, when you reply to a specific comment, the contact persons will not receive the notification in their application and will probably forget to come back to answer you again.
Previously it was possible to mention a user by clicking and holding on his name, once inside the comments. His @ username then appeared automatically to speed things up. This option was then removed and clicking on the user went to his profile. Then she was readmitted without any warning. Then? Every now and then also try to use it to see if it is still active or not.
5.6. Delete a Photo

To delete a photo, just be on your profile and click the three dots on the right, at the bottom of the photo, next to the comments button. A window will open where you can delete the photo by simply clicking the “Delete” button or delete. In short, the red button.
With this same window you can also do other things, including share the photo in various social networks, send it via email, copy the url and then paste it in a message to show your photo directly on the website of the Instagram site, or add a tag to some person you want to connect directly with your image.
5.7. The Notification Center
In the news option you can see who likes your photos and who writes comments or follows you. You can also browse their activities to see if they are active and if they interact at least by clicking like on other photos.
If two of your friends are also friends with each other, you will also be able to see if they write comments. With the new introduction of the Photo Map, now you can also see all the people who insert their photos on the map and activate the service.
Note that the notifications concern only the last period, the most recent and unfortunately it is not possible to scroll too far back, especially if you receive many likes or many comments on the photos.
From version 6.10 it is possible to activate notification for one user only . That is, you can only receive notifications from certain specific people. To do this, go directly to the profile of the person you are interested in following even more specifically, click the 3 dots at the top and activate the option “turn on the notifications” or something similar in case it is changed. This way you will be notified every time that user posts a new photo.
5.8. Send a Direct Message
With the latest update to version 5.0, Instagram adds direct messages between users. Function already chatted for a while and which provides the ability to send both photos and videos to your friends.
Activating this function is very simple, and in any case Instagram will guide us on how to do it as soon as we have updated the application. In the home we will see a sort of box icon at the top right. By clicking this icon we will access the direct message mode, just click on the + at the top to start the procedure.
Everything is done as usual, both for photos and videos, with the difference that you can only choose some specific people to send this photo or video message to, and everything will remain private.
When we return to the direct messages, we will see our previous messages sent. Convenient and fast. But then we will need to see how it works for those who have pages or activities and risk receiving several unexpected messages. For now there is no function to block this function, but we will see if there will be future updates to that effect.
6. Solve Problems on Instagram
Obviously, in a large social network like this there are also often problems that can be faced and that if you know how to deal with them at best, they may solve some headaches.
6.1. Cancel or Report a Comment
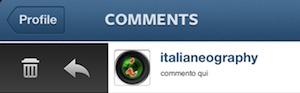
To delete a comment you must first click on the comments button, as when you write them, then swipe your finger from left to right on the icon of the person who commented, in the same way you learned to mention a user : click the icon now of the basket on the left. At this point you can access the page to cancel or report the comment.
Knowing how to delete a comment is important because it is often wrong and it is useful to correct. Version 3.0 changed the mechanism a bit but also added the ability to report if the comment is spam or violates the Instagram rules.
After clicking on the basket on the left, you can decide whether to simply delete the comment by clicking on “Delete” or delete it and make a report at the same time by clicking on “Delete & Report Abuse”, red button.
6.2. Block a User

To cancel or delete a follower that bothers you, you will need to block it. It’s very simple, just go to his profile, click the arrow at the top right and a window will open with the words: Block User, Report for Spam. By clicking and confirming the block, the user will be deleted from your list of followers . The user will not be notified of your block, they will simply no longer see you in their Feed and will not be able to post comments on your photos anymore.
The same procedure can be done to unblock the person, who will not return to our list of followers and if he wants to follow you he will have to do it again. This is a good way to download users who are not active or who do not care that they follow us without necessarily blocking them for a long time.
6.3. Can a User I’ve Blocked on Instagram See My Photos?
The user you blocked will not be able to see your photos using the Instagram application, but if your profile is public, the user can always use third-party web applications or smartphones, which connect to Instagram, and will still be able to see this. that you publish. However, he will not be able to follow you, or interact with you in any way.
If you want to be 100% sure that you will never be found , then you will have to set your profile as private, and your photos will only be visible to your friends / followers, even using third-party applications, both from a computer and a mobile device.
6.4. Communicate to Instagram a user or photo that creates problems for you

Version 3.0 has changed the game a bit, and honestly there are now fewer options to better specify to Instagram why you’re reporting that user or photo to it.
You can still choose two methods, either report a user violation in general, or report a single photo violation, and there is no going back if by chance you get it wrong. So be careful!
Following the same procedure on how to block a user, simply click on “Report for Spam”. This is now the only option available.
If you want to communicate any violation of a photo, instead of going to the user, go directly to the photo in question. At this point click the usual 3 dots on the right, under the photo, and a new window will open visible below.
Here, simply click “Report Inappropriate” and a message will be directly sent to Instagram. There is no way, for now, to have other options; which unfortunately limits the possibility of specifying a little better why the report is being made, and also having the possibility to go back if by chance you made a mistake in clicking. Previously there were many more options, now you will have to write directly to Instagram support if you want to be more precise in the complaint and maybe have some answers.
6.5. A user has my photos, how do I get them to remove them?
In addition to doing the steps described above, the only way to indicate to Instagram that a user is posting your photos, your property or your own representatives and that you do not want to be published, is to contact them directly at this email address, write the precise reference field, in this case “copyright” or “report abuse” and explain your reasons.
6.6. Contact Instagram

With version 3.0, the way to contact technical support and find all relevant information has been optimized, although in reality there will be various links that will then refer to the opening of the browser to navigate the information directly on the navigator. Go to your profile, click the wheel at the top right, and then the “support” button at the top right again.
Alternatively, if your account has been hacked, or for some reason you are no longer able to log in and enter it, from 2017 you can go to the social Help Center and ask for explanations. On the same page, on the left, there is the Login & Troubleshooting menu, to answer other questions about login problems.
6.7. I have lost my password. How can I do?
If you want to change your password because maybe you are afraid that someone has illegally entered your account, go to this password change address. If, on the other hand, you no longer remember the password, you can reset it by going to this password reset address. Please note that you will need to enter your username or email address, and that confirmation will still be sent to your email address. The address must be valid and you must have access to it, if you have lost the password to access your email address, Instagram will not be able to help you, and you will have to contact your email provider to get your password back. When entering the email address, pay attention to upper and lower case letters, because the system is sensitive to every letter.
6.8. What if My Account Has Been Canceled?
If you have decided to cancel your account for some reason and then have changed your mind and want it back, it will be too late. Once your account is deleted you will not be able to recover anything since Instagram declares that your profile and your photos will be immediately deleted from their servers.
If, on the other hand, your account has been deleted due to violation of the terms of Instagram, or spam, then the only thing you can do is ask the support team for an explanation directly at this email address, specifying your reasons.
7. Get to know Instagram at its best
There are many functions that can be known in this great social network, and in this section we will go a little beyond the basics to know and deepen some additional details.
7.1. Find Friends on Instagram

You can also find friends who use Instagram by using the app’s internal settings. There are options to import your contacts, your Facebook followers and look at suggested users. The latter often have many followers and it will not always be easy to interact with them.
If you want to find people who use Instagram near you, in your city, you could always search for their photos on Streetgram, use Instamap for Android or Instamap for iPhone and iPad and then contact them directly, perhaps chatting together using the appropriate InstaMessage for iPhone and Android.
Patience is the virtue of the strong, use good strategies and you will have a good group of friends. And if you have some extra time between searching for a friend or the other, you could always eat an Instagram cookie to stay in the right mood.
7.2. Find other Followers or Delete them in Bulk
Although at first we try to quickly increase the number of people who follow us, it is a good idea to be patient and avoid joining the #followback circle. If the people who follow you are not interested in your photos anyway, they will never like them, they will never write comments and they will never look at your feed: they become what are called GHOST FOLLOWERS, or ghosts.
As already explained above, following a large number of people, or being followed by those who follow a large number of people, will give little guarantee of interacting, and difficulties in following them. The InstaBlast iPhone application tries to improve the notifications of our favorite followers.
A tip, in addition to following people you obviously know, or are part of small groups of common interest, is to search for genres you love with hashtags, and then comment on the photos you like. Do not write comments equal to 10 people in a row because Instagram will block you by recognizing it as spam, but then it wouldn’t make much sense to do so anyway!
The more your comment will be interesting, the more the person reading it will be willing to look at your photos at least. If they like them you will have the opportunity to be followed by whoever you like, and it will be a win-win situation for both of you.
If you realize that you have everything wrong and you want to free up your account a little, you can use Igexorcist, which will make a good sweep, maybe even too much.
7.3. Is there a limit to the number of followers I can follow?
With the latest updates, Instagram has also begun to add a series of limits to the number of followers you can have, or the number of people you can follow. This was created to avoid spam and to reduce the automatic action of software that increases and decreases numbers disproportionately. We have therefore announced that with this update Instagram has limited the number of followers to 7500. In the same article it is explained that other limits have been added, such as the number of comments, the number of people you can follow in an hour and so on. .
7.4. How Many Photos Would Be Better to Post?
Well, believe it or not, quantity is never synonymous with quality and above all it often becomes irritating. At first, many users tend to post a lot but you have to be patient. Keep in mind that if you follow even 100 people and they post 1 photo a day, you will find yourself with 100 photos a day to see. If you post 20 a day, you will soon risk irritating people who may stop following you or just jump quickly and move on to other users.
The more the quality of your photos is important, the less you should post. Unless you intend to use Instagram like Facebook and then obviously the concept changes. There are so many different uses. 1 to 3 photos a day might be a good idea, up to 5 maybe (but not every day) . Then start thinking about your friends. If only 100 people follow 5 photos each day will make 500. Impossible to manage for anyone. Especially for busy professionals who want to follow good people.
7.5. How Do Hashtags Work?
You can add hashtags (#) to comments, which are keywords that you give to photos preceded by the hash symbol (#). Similarly, you can also search by keywords in the search field of the Explore page. This is a good way to find people posting photos that you may be interested in.
Hashtags are used in many ways such as the #italianeography tag. They are used to create challenges, awards, international, national, local, concept, gender groups and so on.
Most are used in English for greater visibility. The maximum usable number is 30. It is not necessary to write them immediately, but they can also be added in subsequent comments to your photos. There is no point in putting them in other people’s photos because it no longer works, the owner of the photo will have to add them.
Some applications post a list of the most used tags, such as those you can find on Websta.me which we will see later, and for example Instatag for iPhone, which will also try to manage them better.
Beware that not all hashtags on instagram are allowed and using some of them you could risk being banned or temporarily slowed down.
7.6. Why Don’t Hashtags Sometimes Work?
With the purchase of Facebook, some things have probably also changed from a technical point of view. The number of people is increasing more and more, as is the number of spammers. Instagram servers are overloaded, even several times a day; for this reason, the uses of hashtags are sometimes limited, both in certain geographical areas, and to certain users, and to certain hashtags that are overused at a specific moment.
This reduction is absolutely random, it doesn’t depend on the user (unless you post more than 30 hashtags), and there’s nothing you can do about it. It is not known how these limitations work, and who is generally affected by them; we just have to wait a little time to hope that the situation will change quickly and be able to return to insert the hashtags in our account.
7.7. To Cancel my Instagram Account?
If you want to delete your account, just go to the Instagram website, click on the bottom left (your account), enter your username and password, and you will find yourself in your profile, where at the bottom right it says “I ‘d like to delete my account “.
On the same page you can also manage the external applications that you have linked to your profile, which allows you to delete those that you no longer care about giving the application, and also check if someone else has sneaked in.
7.8. If I Delete the Application from My Phone Do I Lose My Photos?
One of the ways to solve application problems is often to delete it from our phone and install it again. This operation also empties the cache by reducing its weight and returning it to its original weight. In a nutshell, every time we look at images, the weight of a part of them is saved in the memory of the phone, within the application itself, the further you go and the more this weight increases, sometimes creating various problems.
If you delete the application from your phone and reinstall it to try to fix or solve these problems, your photos and your profile will remain intact . Photo and profile are saved on Instagram’s servers and not on the phone itself; the only thing is to remember the username and password to be able to access the service again. To verify that your username and password are correct, you can always go to the instagram.com site and log in with your details, if you enter it means that everything is fine and you can proceed with peace of mind.
7.9. How to Use Multiple Accounts and Profiles Together
At the beginning of 2016, Instagram finally introduced the possibility of using multiple accounts, i.e. multiple profiles for those who manage the personal profile and also other company or group profiles.
The way to use them is very simple. Go to the settings ring that you normally find at the top, and in the options, where there are the various privacy terms etc, before logging out there is the ADD ACCOUNT function, or add profile.
You can now switch from one profile to another simply by clicking on the menu bar at the top, where there is the profile name, or by clicking on the icon at the bottom right, where before there was the little man of the personal profile.
The fact remains that you may be interested in other alternatives to do this, and you can therefore find them in this article on how to use instagram with multiple multiple profiles
8. Other Curiosities on the Instagram World
Connected to Instagram there are now a huge number of applications and services, and if you are a lover of this application you will surely find out there much more than what you thought could be connected to it. We may see someone below, and other services we have already seen along the explanation of the application in various sections of this guide.
8.1. Create Wallpapers for Facebook and Twitter

An interesting way to integrate the two Instagram and Facebook services could be to create your own presentation cover on Facebook with photos taken from your Instagram profile. To do this, a simple service is Instacover, which allows you to connect the two social networks in a very simple way, and to create your presentation image just as quickly.
From the same family as Instacover, but this time dedicated to Twitter, it’s InstaBG. Also in this case, it will be very simple to connect and integrate Twitter and Instagram, in order to have your Twitter page with the background of the various Instagram images of your profile. A bit like what happens on our Twitter page.
8.2. Download Your Own Instagram Photo to Computer
If you want to download your photos to save them on your computer or eventually upload them to another social network, you can use services such as Instaport and Copygram. Both are excellent services and allow you to download your photos both by sending them in compressed .zip format to your computer.
The services are not limited only to this operation but offer a whole series of other tools that are gradually updated, allowing for example to export the photos to other social networks, to choose how many and for what period you want to save the photos, and etc. They are worth a try to see what works best for us in a given period of time.
8.3. Web Applications. Using Instagram on Computer
As mentioned above, photos and Instagram profiles are also visible on the web, using a flood of free services made available by various applications. Perhaps the most popular is iconosquare.com , which offers the ability to see various fun photo statistics as does GramPRO for iPhone, for example.
But there are many others, from the Italian Followgram and Esportagram, to ink361. Or Websta.me , which offers a list of the most popular hashtags and a forum for users, hashstagram, and more. And if you want to try to upload photos from your PC, there is always Gramblr.
More recently we find socialRank, an app to calculate the ranking of your followers, very useful for those who do marketers.
8.4. Selling Photos and Making Money with Instagram
Selling your photos is certainly not always easy and some services have decided to give the possibility to connect Instagram directly to the sales services. For sure there will be many evaluations to do, but if you are interested in entering this market, you can evaluate some options, such as selling sponsor photos within your profile.
The best thing, after considering some services, is to scroll through the various offers that we often deal with on how to earn by selling your photos and which are updated to the latest news, and you will certainly find which option is more for you with or without instagram .


